|
SKS Carbine Trigger Tuning and Modifications
If you do not feel 100% confident with a modification you plan to attempt to ANY firearm simply do no proceed. Firearms
are not toys to tinker around with. Your safety and the safety of others is in jeopardy when using a firearm modified in an
unsafe manner. Above all, make sure your firearm is UNLOADED and NEVER USE LIVE AMMO to test the function of your firearm.
NO EXCEPTIONS!!!
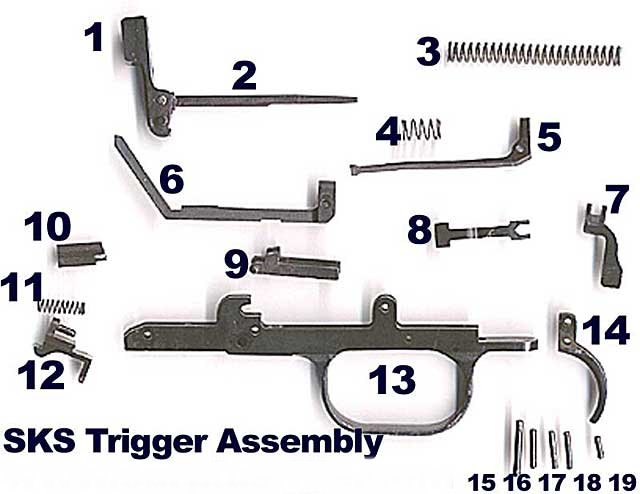
SKS Trigger Parts Legend
Part # Part Description
1 Hammer
2 Hammer Strut
3 Hammer Spring
4 Trigger Spring
5 Trigger Bar
6 Disconnector
7 Safety Catch
8 Safety Catch Spring
9 Rebound Disconnector
10 Sear
11 Latch/Sear Spring
12 Cover Latch
13 Trigger Guard
14 Trigger
15 Latch Stop Pin
16 Disconnector Hinge Pin
17 Trigger Pin
18 Safety Catch Pin
19 Trigger Bar Pin
Trigger Pull, Weight and Smoothness (Or lack thereof)
The SKS Carbine has been produced by several countries. Variations in quality and finish of parts is somewhat apparent
from country to country. One thing that is almost universal between all SKS's is the rough and sometimes gritty feel of the
SKS trigger. Some carbines are worse than others, though almost all could use some improvement.
One of the easiest things to modify is the replacement of the hammer and sear springs.
I would like to emphasize the importance of taking your time and continually checking your work as you proceed with this modification.
I recommend you make the modifications to a spare sear in case too much metal is removed. Also, be sure you leave SOME creep
in the trigger for added safety. A hair-trigger is not the safest condition with the SKS's Trigger design. Please don't get
over-zealous in modifying your trigger. Safety should always be your number one concern!
As an addendum to this article, check to make sure your safety works properly. Set your safety then attempt to pull the
trigger. The trigger bar should not contact the sear AT ALL! If the trigger bar does contact the sear, no matter how slight,
your may have rendered your safety inoperable, and you will have to do some slight filing to the sear or trigger bar. Again,
take your time and continually check your progress.
Creating Positive Hammer/Sear Engagement
If you plan on reducing trigger creep, polishing your sear/rails, and installing lighter weight hammer and sear springs,
you MUST also insure you have a Positive engagement of the Hammer/Sear. As I mentioned before, the substantial creep of the
trigger acts as a safety cushion for poor hammer/sear engagement. If you have removed the creep, you have also removed this
safety cushion, and therefore are putting yourself and others in higher risk with accidental discharge.
This modification is sear intensive, so again I recommend you make the modifications to a spare sear in case irreversible
harm to the sear is done. Your goal with this modification is to remove as little material as possible, while at the same
time improving hammer/sear engagement. You do NOT want to remove much metal!
Here is a picture of an example sear after this modification.
Modifications were done with an extra fine, half round diamond file and 600 grit wet/dry sandpaper.
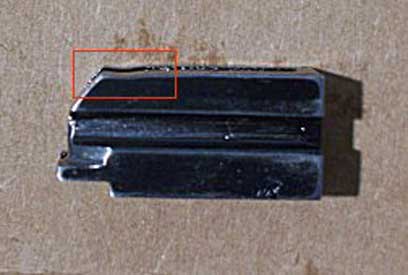
Notice the incredibly small dimple in material highlighted within the red box. This divot, however slight, gives a positive
hammer/sear engagement and will keep the hammer from accidentally releasing if bumped. When bumped, the hammer (under tension
of the hammer spring) will follow the path of least resistance or migrate to the bottom of this dimple, away from the edge
of the sear (no accidental release!).
How The Hammer and Sear Work
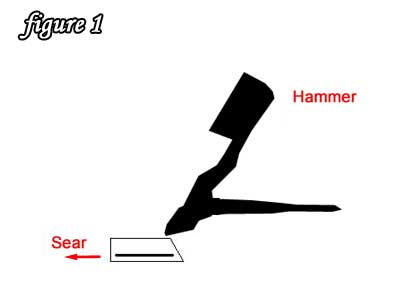
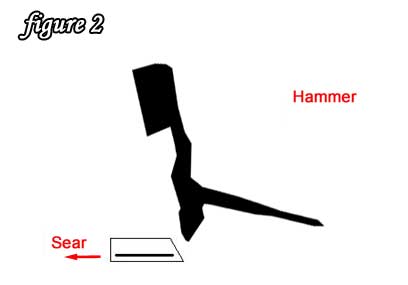
Figure 1 shows the the relationship of the hammer to the sear. The lower edge of the hammer rides on the top of the sear.
As the sear is pushed forward, the hammer gets closer to the edge of the sear. Figure 2 shows what has occurred once the sear
has moved out of the way. When the hammer has reached the edge, the sear no longer acts as a stop, and the hammer is released
and flies forward.
So what does it require to create a positive hammer/sear engagement?
Think of the hammer at a teeter-totter. The top end of the hammer (that strikes the firing pin) is one end of the teeter-totter.
The lower end (where the hammer rides on the sear) is the other end of the teeter-totter. The "pin" the hammer rotates
on is the balance point. Push up on one end, the other end goes down. Push down on one end, the other goes up. This is the
mode of thinking you must be in at this point.
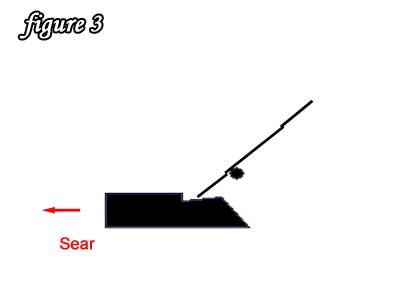
Figure 3 shows a modified sear. Notice the notch taken from the top of the sear. The hammer has been replaced with a "teeter-totter"
to help display how this notch effects hammer/sear engagement. I'm going to ask you to use your imagination here. Picture
the sear moving forward as the arrow shows. As the sear moves forward, the teeter-totter is forced to climb up the "ramp"
created on the top of the sear. As the lower portion of the teeter-totter is forced up the ramp, the opposite end of the teeter-totter
is going down. This is positive hammer/sear engagement! As the sear is pushed forward, the hammer moves rearward before breaking
free! If the firearm were knocked or jarred in this situation, the hammer (being under high spring pressure) would take the
path of least resistance. In this case, that would be down the ramp, and away from the end of the sear! This is why positive
engagement is so important. If the firearm is knock or jarred, the hammer will not be knocked closer to the edge of the sear,
but rather away from the edge! This ensures the hammer will not accidentally release!
I will also show you an example of negative hammer/sear engagement to help you further understand this concept.
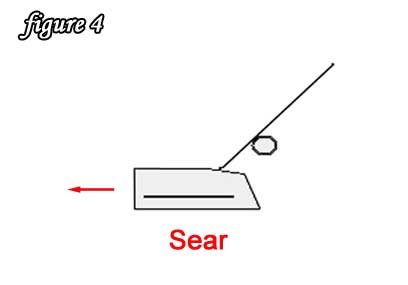
Figure 4 shows negative hammer/sear engagement. Notice that as the sear would move forward, the lower portion of the "teeter-totter"
will be moving down a ramp on top of the sear. Moving down the ramp lowers the bottom portion of the teeter-totter, so conversely
the other end of the teeter totter is going UP. This is what you DO NOT want! In this situation, the hammer would creep forward
as the trigger is slowly pulled. This also means that if the hammer is cocked, and the firearm is knocked or jarred, the hammer
would again take the path of least resistance. In this case, downhill, and would creep further toward the edge of the sear
and possibly even release causing an unwanted accidental discharge!
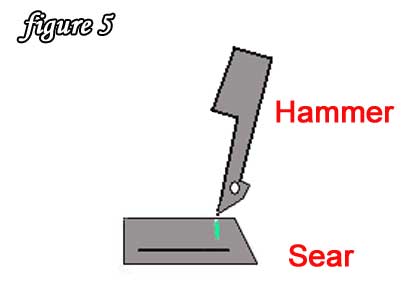

* First you need to cock the hammer and take note of where on the top of the sear the hammer naturally rests. (Figure
5)
* Next, you will need to remove the sear from the trigger group.
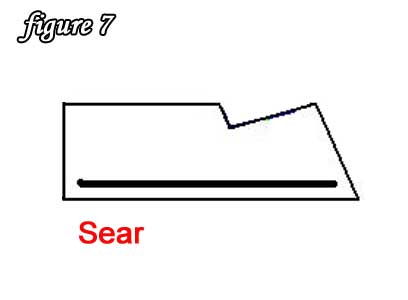
* Using an ULTRA FINE Jeweler's type file, create a notch on the top of the sear similar to that seem in figure 7--The
notch is exaggerated--you do NOT need to remove this much material. It does not require much metal removal to reach your goal.
Remember the example sear from above! A deep notch creates a heavier trigger pull due to the hammer being pulled back (against
spring tension) more than necessary as the sear is released.
* The notch needs to start just forward of where the hammer naturally rests on the sear when cocked. (figure 6) Notice
the green mark is where the hammer naturally rests, the blue portion shows where your notch should be. Take extreme caution
not to remove any metal from the edge of the sear where the hammer is released (red arrow). Removing any metal here will cause
adverse effects (Negative Sear Engagement!!!) As with any modifications here, remove small amounts at a time and Continually
check your progress!
* Once the filing is complete, polish away the filing marks with fine sand paper or other methods. The smoother the
top of the sear is, the smoother your trigger will feel when everything is reassembled. Again, take care not to get too close
to the edge of the sear. You want the end to remain even and crisp.
* That's it! Take caution when re-assembling everything. Make sure you don't mar any of your freshly polished surfaces.
Coat the sear grooves, sear, hammer, and frame rails with a light coat of oil or gun grease.
* The last thing you need to do is ensure all your hard work actually did improve your firearm. Repeatedly test by
cycling your bolt and pulling the trigger. Make sure the hammer is being cocked and held securely in place by the sear. Make
sure the trigger is releasing the hammer, and nothing else. Cock the hammer, and with the safety on, repeatedly (15 times)
firmly place the firearm's butt on the ground. Slap it with your palm. Bump it against a wall. Drop it on the floor from a
few inches. Make sure the hammer has not released...after 15 knocks/jars/and jolts release the safety and pull the trigger.
If you her that signature click of the hammer, you did it right! Sit back, and suck down a cold one for all your efforts!
Your SKS is now safer and the trigger is much more enjoyable!
Congratulations, you have now modified your SKS trigger to be smoother, lighter, and have significantly less creep. You
will reap the benefits of having a safer, more repeatable trigger system... It wasn't so hard, was it?
Shoot safely!
|
